Showing posts with label sew. Show all posts

Sunday, 5 October 2014

The Bear Facts


Anyone who's read my blog will know that I love making miniature teddy bears.  They tend to be made intermittently depending on how well my hands are working.  I set myself a quota of at least 12 bears this year and even with everything else thats been going on, I've already achieved my goal, which has made me very happy!

I make my bears mainly for friends and family and usually have a number of people sitting patiently on my "Teddy To Do List".  When people reach the top of my list and if it's not a surprise gift, I often get asked the same questions, so this blog post is being written to address some of those queries.

Funnily enough I find miniature bears easier to sew than large ones - my left hand doesn't work as well as my right, so the smaller pieces are easier to hold than bigger bear bits and I can turn the small cotter pins I use for the neck joints, where I find the large ones impossible.  I also enjoy the challenge of working at this small scale.  I like to make sure my bears are as good as I can possibly make them so they are all hand sewn with extra strong thread and a lot of love.


I currently use three types of fabric for the main body of my bears.  All are made from synthetic fibres, as is the Ultrasuede fabric I use for the paws.  I use one basic teddy pattern which has a very traditional look and creates a bear who is approximately 8cm (3 1/4 inches) tall.  I have plans to create kitty and bunny patterns in the future, I just haven't got around to the drawing stage yet - thats on another To Do List.

1.  Cashmere
This fabric has the shortest pile but has a very touchable, soft and velvety feel, and it usually comes in a huge variety of colours...

   
Percy & Milly (made for a Hello Kitty fan) are both made from cashmere 


2.  English Velvet
I can't source this fabric anywhere at the moment.  I was lucky enough to be able to buy a small batch of this fabric a couple of years ago from a supplier who was retiring.  It has a longer pile than the cashmere and a slightly bristlier texture, though still very stroke-able.  I have much more limited colours in this, mainly natural browns and beiges, some slightly more golden shades, plus a green, a blue and a rose pink...

 
William & Raphael are both made from English velvet

3.  Sassy
This has the longest pile I currently work with.  It was developed in America specifically for miniature bears, it comes three types - frosty; long pile; and smoky - and a wide range of colours.

 
Bai & Clarabelle are both made from Sassy long pile

Frosted Sassy has a lot of colour in the base fabric but very little in the actual fur - Bai's arms, legs and ears are made from frosted fabric although as she's quite a light colour, the effect isn't too noticeable in her photo.  All coloured Sassy fabrics have been hand dyed (not by me - at least not yet...), except the white long pile and the natural grey smokey.

Sassy smokey has a dark base fabric which gives a different look, in the photo below you can see two bears - Pumpkin, who is made from cashmere and Greta, who is made from Sassy smoky, so its a good photo to see the differences in the different types of fabric...


I make a rule of never combining different types of fabric, but of course I do on occasion break my own rules - I was lucky with Sidney that it worked out, but I don't generally recommend mixing like this...


Sidney is made from a mixture of a leopard printed cashmere and an English velvet like fabric, both of which I don't seem to be able to find anymore, though I currently have a few remnants left.  And once in a while, I'll pick up a different piece of fabric, like I used for Herbert here...


I hope this post will help my friends to choose their new teddy bear friends.  At some point I'll do another post with some of the fabric colours I have in my stash and add a link on here.  If anyone has anymore questions, please feel free to ask.

Sunday, 8 December 2013

A Year Of Happy 6/52

I have rarely ventured outside my front door this week but I still have things to be happy about...

Firstly, I DID venture out to the Post Office on Monday - and posted all my Christmas cards and parcels that were destined for people living further away.  It's the first time I've ever been organised enough to send them all off so early AND all at the same time.  It's also the only year when I haven't bought any stamps in advance so the total postage cost was a bit of a shock but I'm SO happy to have this done so early  :)


My cards are a lot simpler this year, but they are handmade and all identical - or as identical as a handmade Christmas cards can be!  I've had complaints before that I sometimes give cards that are very like ones I've given previously, so as I've never sent anyone a card like this before - problem is solved.  I've never done so many cards of one design but it was a great challenge and a great opportunity to apply some of the skills I learned on one of the printing workshops I attended earlier this year.  I took photos as I created these cards which I'll write about very soon.

My second Happy is another gift crossed off my Christmas present "To Do List".  Earlier this year I decided I wanted to make some pretty hair clips for my youngest niece, I even bought the clips a few months ago.  I know my niece likes sunflowers and ladybirds, luckily I had dies for both, so I made two clips...


I have a cat who hates having his photo taken - except when I'm taking photos of things other than my cat, so photobombing has become a hobby of his...


I really enjoyed making these for my niece, hopefully she will enjoy wearing them  :)

Spending so much time at home this week means I have managed to cross several items of my gift list but I've also finished an extra bear I started by accident last week.  I grabbed a bag of ready cut bear bits as I headed out to Craft Club, I thought I'd picked up the pieces for a bear I've been planning to make for our Craft Club exhibition thats happening early next year, instead I picked up bear bits for another bear with the same coloured fur but in a different combination.  Once I've created the head of a hear and sewn it's little face, it tends to look accusingly at me until it has a body and limbs!  I always make bears faster when I make them head first, so even though this was a "spare bear" I just had to finish him once he started giving me that look...


Could you have resisted that little face?  I was thinking of calling him Murray until one of my friends suggested I should name for a very special person who died this week, so this is Nelson - who is no longer spare.  He very quickly found a home with one of my friends and I'm looking forward to her coming to collect him in person in the New Year  :)


Sunday, 1 December 2013

A Year of Happy - 5/52

What has made me happy this week?  Not all my Happies are craft related - the first was the simple pleasure of freshly laundered bedding.  Don't you just love crawling into a clean bed?  Despite how much I suffer after the struggle of changing the sheets and how hard I find it to get out of the bath - it really is worth going for both on the same day even if it's all I manage - sheer luxury!  :)

I also had an unusual view from my window this week, especially as I live in a first floor flat (or second floor apartment to my US friends)...


Its a relief that the rotten wood has been replaced in the gable over my bay window, so now I know my loft is properly weather tight again.  I saw the old piece of wood they removed - it fell apart as they were taking it down, so I'm even more thankful that it stood up to that awful storm we had recently.

My next Happy comes from making the effort to cook a "proper" meal for myself from scratch (with a lot of cheating)!  My online shopping came earlier this week and I'd ordered some field mushrooms as they were on special offer.  I discovered a recipe a while ago for healthy low fat stuffed mushrooms, its very simple to make, 2 Quorn sausages mashed up (I find it easier to cut them into small pieces first as my hands aren't too clever), pop them in a pan with some onion (I cheat and use frozen chopped onions - no tears!) and I also add some frozen chopped mixed peppers which aren't in the recipe but I like them.  Plus you chop the mushroom stalks and add them to the pan too.  I'm not terribly good at following recipes - I just chuck everything in together to cook, but the end result is very tasty.  I had mine as a main meal, served on a bed of rice (again I used frozen cooked rice) and drizzled with a little BBQ sauce - yummy!  And as I got 4 mushrooms in the packet, I had this for dinner twice this week, when you look at the calorie count in the recipe, it makes you even happier!  Unfortunately I don't have a photo to go with this as it was so tasty and I was very hungry  :)

Finally you get a photo of something I've made (sorry for the quality, most of today's photos were taken with my mobile phone camera)!  I've been working on my Christmas list again this week, ticking another name off the list makes me very happy!  :)  Only one thing has frustrated me this week and that is the fact that my living room carpet is like the Bermuda Triangle of crafting.  It seems like anything I drop on it instantly disappears!  I can understand that dropping about a dozen 4mm green crackled glass beads are going to be hard to spot on a green carpet (that was a couple of months ago and I never did find a single one) but last night it was a beaded hoop for a wine glass tag - so a silver plated metal hoop with silver plated crimp beads and 6mm red crackle beads, you would have thought that something would show up wouldn't you?  But no - I searched everywhere both last night and this morning when it was sunny, and nothing - sigh.  I have admitted defeat and beaded up another hoop so I can finish putting together my gift... another tick on my Christmas list!  :)


A stocking for a friend's beautiful Scottie, it has a doggie treat and a little gift for my friend tucked in the toe - that's two ticked off the list  :)


I found the perfect frame for this picture I made a few weeks ago for my cousin, so that's another tick  :)  I even managed to resist popping the bubble wrap that arrived wrapped around my first Christmas present the other day, it was just the right size to protect this  :)  :)


Here is another set of wine glass savers I made as another present.  They are less colourful than the other ones I've made, I used faceted black onyx beads for these. Another tick off the list  :)

All in all, it's been a pretty good week... even made it to Craft Club too  :)  :)  :)

Monday, 25 November 2013

A Year of Happy - 4/52

Well I haven't ventured out much this week, the weather has been mostly cold, wet and miserable but its been quite a good week for ticking a few people off my Christmas present list which I'm very happy about.

When I decided I would like to hand craft all my presents this year, I didn't take into consideration just how much time and energy it would take, so as time is passing, I have cheated and bought a few presents but I'm happy that I've also made use of some of the crafting materials I have on hand and this week I've enjoyed the challenge of turning some of them into gifts.  So all my happies for this week are crafting related...


My first happy is that I finished my Secret Santa gift this week!  Obviously I can't give you any details about this one right now as it might spoil the surprise if my SS recipient sees it, but there was a great sense of achievement when it was done.  You might also notice I had another little play with my question mark illustration on Photoshop during the week too - I wanted to make it look a bit more interesting.


My second happy is a pair of cushions I've made for my eldest niece and nephew who recently bought a house between them as a way onto the housing ladder.  They have a mid-grey sofa with green piping so I've made these out of a piece of fabric I bought earlier this year.  The fabric design sometimes makes me think of a coastal scene and at other times it makes me think of Venice - either way, I knew I wanted to decorate the cushions with "bunting".  I bought half a yard/metre if this fabric, which was enough for two cushion fronts but not the backs, luckily the strip I cut off the top of the fabric, was wide enough to decorate the back...


I used a simple pillowcase construction and attached the strip to the edge of the top flap, the rest of the back was cut from a large piece of cream cotton I bought I few years ago and never used.  The "bunting" is made from the cream fabric too, I wanted to keep it plain so it didn't distract from the lovely green fabric.  I was also incredibly lucky with how the back strip worked out - just enough to be able to place the buildings at the top and some boats at the bottom.


I did the stitching with a mid-grey cotton which will hopefully match with the sofa.  I'd never done machine applique before - it was a little scary but I'm pleased with how it turned out.  One last photo...


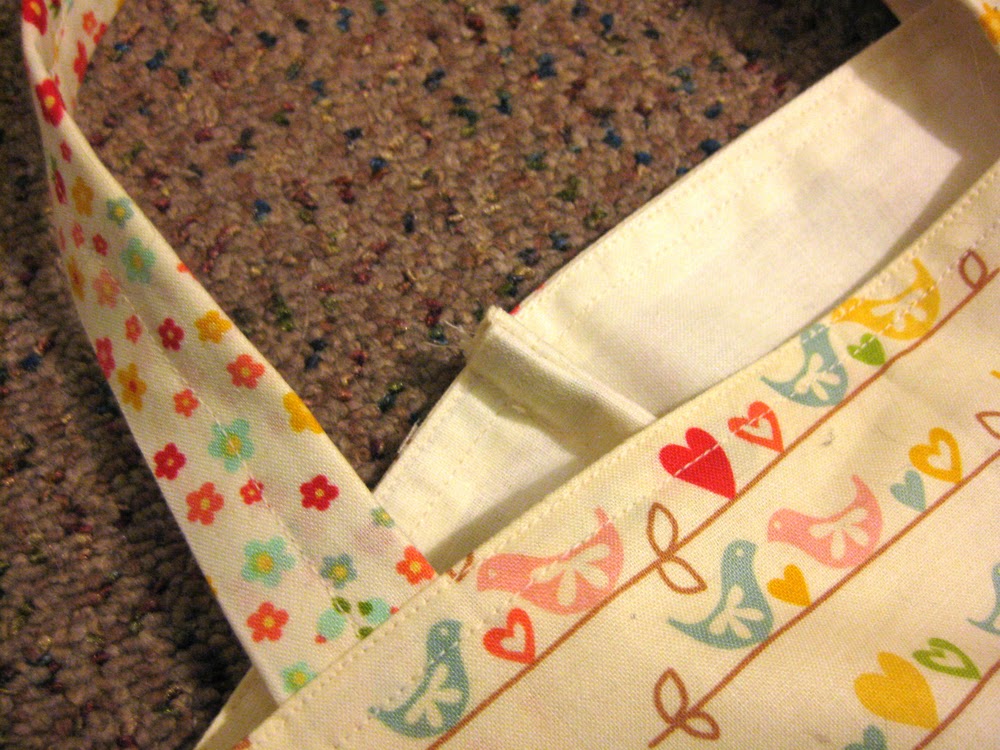
My last Happy is a bag I've made for a friend of mine - she loves environmentally friendly shopping bags.  She's also a quilter so the bag needed to be really well made...


I used some more of the cream fabric and added a border of a pretty birdie fabric which I used as inspiration for the machine applique I used on the front.  This shape wasn't as easy to sew around and it wasn't as easy to see what I was doing as the colours were so similar.  The handles are reinforced with webbing and sewn in about 5 times on each end, while the side seams are double sewn so all the raw edges are hidden (I have no idea what that type of seam is called).  The bag itself is made from a single piece of fabric which will hopefully make the bag stronger and give my friend a reasonable amount of use out of it.

Hopefully I haven't spoiled any surprises here as I'm reasonably confident that my niece, nephew and friend don't read my blog.  If any of them come across this before Christmas Day, then please accept my apologies, but I was just so happy with what I've made this week that I really wanted to share  :)

Sunday, 7 July 2013

100th Bear & A Giveaway!


This is Bai - her name means 100 in Chinese (according to Google translate) and she is my 100th bear! I decided before I started sewing that I would make her as a giveaway and I'm going to stick to that even though I've fallen in love with her myself! I attend a craft club at my local library once a fortnight, the next meeting is this coming Wednesday, 10th July, which is the date on which I'll get someone to draw the winning name out of a hat or something as that seems to be the fairest way to find Bai's new home.

One hundred bears sounds like a lot doesn't it? But I made my first bear back in March 1999, so its taken 14 years to reach this point!  For some reason after I'd made my 99th bear, I didn't pick up my needle and thread for days, I felt as though there was a lot of pressure to do something special for my 100th bear, but then thought that if I carried on stressing over it, I'd never get my 100th bear made at all!  So in the end, I selected a bag of bear bits I'd already cut out some weeks ago and just got on with things.  I have taken my time on Bai - firstly because my hands have been playing up lately, but also because I didn't want to rush such an important bear - I wanted to enjoy the process.

Bai, like the majority of my teddies is around 8cm (just over 3 inches) tall, she is made from Sassy Long Pile white and frosted lilac fabric with ultrasuede paws and black glass beads for her eyes.  She is NOT a toy, she is suitable for bear lovers/collectors over the age of 14.

I'm going to post Bai's photo here, on Facebook, and on my Flickr account so that hopefully most of my friends can have a chance at winning her if they want to. If you'd like to be included in the draw, please leave a comment below. I'm sorry I haven't allowed a lot of time for this but I don't want to get too attached and Bai is very impatient to find out where she's going to live.

Good Luck Everyone!


UPDATE - 10th July 2013 - Our Fibro group met at the local Wetherspoons this morning and a very nice lady who worked there drew the winning name out of the hat - I even found an actual hat  thought it looked better than a plastic supermarket bag! Anyway the person who won little Bai Bear was.... (drum roll) Clare from "Summerhouse by the Sea" who entered the draw via this blog page... there was an amazing 48 people entered in the draw! As Clare was sitting right next to me when she name was drawn, Bai has already gone to live her new home. xxx

Wednesday, 3 July 2013

Inspired by Moby and Alice

Once a fortnight I attend a craft club at my local library and every so often we tackle a book related craft project.  Our first project was based on Herman Melville's "Moby Dick" and our second and most recent has been Lewis Carroll's "Alice in Wonderland".  Its entirely up to us as to how we interpret the theme, we just use the story or characters as our inspiration.  The club has only been running for a few months so far, but its lovely to get together with other crafters, enjoy the company of like-minded people, learn from each other and it's great to see how everyone else interprets the themes.

I meant to blog about my Moby Dick themed project a few months ago, but looking back through the posts I've published, I've realised Moby got away from me somehow, so here he is now...


I still need to get some dowels so the wall hanging can actually be hung up, but I was quite pleased with the finished piece even though I've never tried anything like this before - at least not in felt!  It made me realise my abilities to work a sewing machine need a lot more work, but it was fun to do.  Some of my inspiration for this piece came not just from the book, but from a piece of stained glass that hangs in my bedroom window.  Years ago before problems with my hands made it impossible to continue with the hobby, I used to love making things with stained glass and while most of the pieces I made were given away as presents, one of the pieces I will never part with is the glass panel in my bedroom.  Although I can't see the sea from my window, it faces the sea which is about half a mile away and is roughly east facing so it catches the sunrise.  Its not very often these days that I'm awake as the sun rises but I do love to watch dawn breaking when I'm able.  I used black thread for all the stitching apart from attaching the beads and anchor at the bottom, it was a deliberate choice because I wanted to make the borders between the felt pieces stand out like the seams on a piece of stained glass - I just wish I'd managed to get them a bit neater!


Apologies for the bad photo, but this was just a quick snap of the glass panel taken on a very dull day!  You've probably already noticed a few of them, but there are four fishes swimming around in the sea.  Most of the panel is made from transparent water glass which is made with gentle ripples which gives a sense of movement; the seagull is made from opaque glass to make it stand out from its background.

My first thought for our current theme was to make a white rabbit, but I haven't yet got around to sitting down with pencil and paper to make a pattern for my bunny, I'm not giving up on the idea but I wanted to be able to produce something for our last meeting so I made a bracelet.  I've had the card charms for some years and the bunny charms for a couple of months, though I did have to buy the rose charms and the dark grey/black glass pearls in order to put together the bracelet I had in mind.  Several times I wasn't sure it would work out but after a couple of false starts I finally figured it out.

I have very chunky wrists so sadly the bracelet doesn't fit me, but one of my daintier friends has tried it on and I was pleased with how it looked on her.  I could have made it bigger but it would have ruined the pattern, it was made for the exhibition we will eventually have at some point, so it doesn't really matter that it doesn't quite fit my wrist, it wasn't really intended for me anyway!  One of these days I'll have to make a start on that bunny and maybe then I'll be able get the song "We're Painting The Roses Red" from the Disney film, that was the main inspiration for the bracelet, out of my head!  :)


Friday, 14 June 2013

Sue Bear


This is "Sue Bear", she was made in memory of a dear friend who died unexpectedly earlier this year.  I miss my friend dreadfully, the long conversations about anything and everything, the hard work she put into keeping our local Fibromyalgia, ME & CFS support group going, the gluten-free chocolate cupcakes she always arranged for the December meetings, her navigation skills when we went out in my car, but most of all, I miss her laugh - it was one of those infectious laughs that you just couldn't resist joining in and having a good giggle yourself!  She was truly an amazing person with such wide-ranging interests.

Sue had always encouraged me with my bears, she came up with ideas when I was stuck on how to do something and as she knew that one day I'm planning my own teddy bear's picnic story, she used to pick up little bears and other animals to play bit parts in the photographs I'll eventually take to illustrate it.

I always intended to make Sue one of my bears and I thought there would be plenty of time...  I've always had a "Teddy-to-do List" and Sue was on it - I just didn't reach her name in time.  Sue was always a keen crafter herself and some of her craft supplies and tools were left to me, in fact Sue Bear's necklace is made entirely from Sue's supplies and contains 44 beads - one for each year of Sue's life.  I chose to make this bear from green and brown fabrics because Sue had a great love for nature - and oak trees - so the colours seemed to be the right choice.

It's funny... each bear takes on it's own little personality as its made and many of my bears have quite serious expressions, but this little bear looks (to me at least) as though she has a little smile on her face.  I'm not completely sure where Sue Bear will eventually end up, I just felt that she needed to be made, but I'm sure she'll eventually end up exactly where she is supposed to be.

Hopefully I won't leave it so long before I post another blog, I've just been feeling very out of sorts lately.

Friday, 10 May 2013

A Little Awareness

This is a post I meant to write yesterday but I've not been the most organised person recently and have been going through a bit of a rough patch recently.  I feel that even though its a little late, this was a post well worth writing. Yesterday was Ovarian Cancer Awareness Day - this is an issue close to my heart as my Grandmother (who I lived with as a child) died of ovarian cancer and my sister has had her own battle with this terrible disease, I'm happy to say she has been cancer-free for about a year now.

I think raising awareness about ovarian cancer is really important as it's one of those cancers where the early signs can often be missed unless women are aware of the symptoms.  If you want to learn more, you can find plenty of information here.  Ovacome is a UK based charity that raise awareness of and provide support to those affected by ovarian cancer and my sister found them to be invaluable during her illness and has continued to support their work since and I have tried to help her in my own way.

Last year I made a bear which she auctioned at her 50th birthday party and I have since made a couple of other little bears which will soon be helping the cause...


Raphael, on the left, got his name from an article I read in the days while he was being sewn - it was about a vet called Raphael who helped to save the life of a street dog; for some reason I looked up the meaning of the name and discovered it meant 'healer' and I thought it was such a great name for a vet.  Its quite a big name for such a little bear, but it just seemed like the right name to choose - sometimes the names just happen like that.  The little fluffy girl on the right is called Faith, which seemed like a natural choice of name after making Hope for my sister, I think she comes across better in person than she does in a photograph and I hope that someone will fall in love with her when my sister takes her up to London for the Ovacome members day, where hopefully she - and Raphael - will find a new home.  One of these little teds already has someone waiting to adopt them, I'm just not sure yet which little bear she'll choose.


Above are a few other items I've made ready to take with me - some little felt broaches and a beaded keyring - made one evening when I was struggling to relax enough to sleep.  Our local library now runs a craft club once a fortnight and at our last meeting I handed out some little felt bird broach supplies in the hope that I would have a little help to make some items to raise money for the charity and I'm looking forward to seeing what my fellow crafters come up with as I gave everyone the opportunity to interpret the broach in any way they wanted.  My friend Clare has already completed hers and blogged about it on her wonderfully crafty "Summerhouse By The Sea" which you can see here.

Wishing everyone health and happiness!

Tuesday, 23 April 2013

Felt Book Mark

I love reading, though over the past few years I've mostly been reading books related to my photography studies which has left very little energy or enthusiasm for fiction.  But one thing my studies have taught me is that you can never have too many bookmarks, particularly when working on essays and assignments.

Recently I've noticed some lovely bookmarks on Pinterest and decided I would have a go at creating my own version - its also a great way of using up some of the random ribbons and tapes in my sewing box and the felt scraps I'm starting to accumulate.  I used about 18 inches of tape for this one - which sounds like a lot for a bookmark but it means both felt decorated ends extend below the bottom of a paperback or hardback novel so if you keep one end tucked inside the back of your book, its handy for when you need to drag yourself away.  Its a great length for marking pages in bigger text books too.  I also used a couple of buttons for the flowers and a couple of seed beads for the eyes on the bird.  I die cut these shapes but it would be easy enough to hand cut small shapes too.

They are also quite quick and easy to make, so I think I'll be making more of these.


I chose to vary the colours on each side for extra interest.

Wednesday, 17 April 2013

Necessity Breeds Invention!

I was always very impressed as a child that my Grandmother seemed to have a saying for every circumstance and the one in the title is what popped into my head when I was making this bag (it seemed appropriate to photograph it on the beach given my choice of fabric).


Since I've had to start using crutches instead of a walking stick when I go out I've discovered a problem - it's very difficult to juggle a crutch and a carrier bag!  I tried digging out an old rucksack as the hospital suggested but I found it hard to get on and off as my left arm doesn't work too well either.  So the answer seemed to be to find a bag that would fit across the body, that wasn't so wide that it would get in the way, but that was also big enough to carry my usual bits - purse, phone etc., and any odd bits of shopping you might pick up when out and about - such as the local paper, a craft magazine, a library book or a pint of milk.  I thought that such an item would be easy to find... sadly not, so I decided I would have to make my own.  I spent some time looking for a suitable pattern but in the end I had to create that too - using pages from my local newspaper.


My original idea had been to use the beach hut fabric on the outside, make a plainer flap with something appliqued on it and line the bag with the seagull fabric, but I couldn't bear to hide the seagull fabric away, so in the end I used a plain calico for the lining.  The bag is also padded so it will protect my DSLR nicely too.


I also added a loop and lobster clip on the inside so I could attach my purse lanyard for security - plus it gave me an excuse for using some of this lovely ribbon I picked up in my local craft shop!


The handles were triple stitched for strength as I want my bag to last as long as possible.  All that was needed then to finish it off was a button.  I mentioned yesterday about the button... up to this point, all my decisions had been relatively easy so I never would have dreamed that choosing a button would be so hard!  In the end there was me, my friend and the shop assistant involved in its selection and we must have looked at dozens upon dozens of buttons before a final choice was made.


I'm still not totally convinced, but I think thats probably only because I'd previously found the "perfect button" in my button tin - only it was the wrong size for the loop I'd made and I couldn't find anything else that resembled it, this button really does work very well with the blues in the beach hut fabric so I'm sure I'll grow to love it too in time.


Monday, 15 April 2013

Minstrel Needs A Home


This is Minstrel.  He's around 8cm tall and is made from a mixture of mini-bear fabrics - American Velvet and Cashmere; he's stuffed with polyester filling and his feet contain steel shot which gives him the stability to stand independently.

I made Minstrel for an auction arranged by some friends of mine in a group I belong to.  All the members of the group are creative people with chronic health problems and all the items have either been donated or handmade and donated by them - Minstrel is my contribution.  The auction is now open to bids, which can be made up until the closing date - 28th April 2013 - and the person who has made the highest bid will win the item.  All the money raised will be shared equally between Macmillan and Invest in M.E.

If you're interested in bidding for Minstrel you can access him directly here - alternatively you can access the rest of the auction site here.

I wish you very happy bidding, I am happy to be contributing to two great causes which are both very close to my heart, and I hope Minstrel finds himself in a lovely new home very soon.

If you want to know any more about the organisations we're supporting, please follow the links below:

Macmillan Cancer Support

Invest In M.E.


DIY Pincushion

Its been quite some time since I last posted a project on here - sorry but I've been distracted by a lot of other things going on in my life, I have made a few items lately, so hopefully I can share them with you over the next few posts.  I have no idea who - if anyone - reads this, but if you do, it would be great if you left a comment.

Last year a friend lent me a pincushion that attached to the wrist while I was working on a sewing project, it was really useful but I discovered that to get one of my own could also prove to be quite expensive, so I thought there was no reason why I couldn't make my own.  I bought my self a fat quarter of fabric, a piece of co-ordinating felt, some matching embroidery thread and a packet of elastic - the total cost wasn't really all that different in the end to the cost of a bought pincushion but I had great fun planning what I was going to do and it was the first time I'd ever tried die-cutting felt so I also had the excitement of discovering how effective that was too!

I actually cut my pincushion out and embroidered the hearts onto the fabric last year but then came to a halt because at that time, I still hadn't plucked up the courage to try out my new sewing machine.  The machine has been sitting on the dining table for a few days and today I finally decided it needed moving... but then thought it would be a good idea to finish a couple of outstanding projects first.  It actually only took a few minutes to sew around the pincushion - trouble was I'd under estimated how much elastic I would need for my (rather chubby) wrist as once I'd turned it out and slid in a piece of repurposed plastic (to prevent accidental pin acupuncture) and stuffed it, the elastic was tighter than I'd anticipated.  Luckily, I'd prepared two pincushions ready for sewing so made sure my second attempt was a better fit and in fact its currently in my teddy workbox already being put to good use.  :)


The pincushions are a very simple design, were really easy to make and I have loads of fabric left so I might make a few more as Christmas gifts for some of my crafting friends or I might use some of the other fabrics I've bought since or perhaps next time I'll make something more ambitious as I've seen some absolutely wonderful ideas for pincushions on Pinterest - but this one was designed with a particular task in mind and it does exactly what I needed it to do so I'm happy.

I have to admit I now regret that I gave away my old fabric stash a few years ago when it became obvious my old sewing machine was never going to work properly again, but the fabric did go to a good home and the fabric designs I've seen since I started looking again over about the last 10 months, are just SO beautiful that I have given into temptation a few times, so hopefully there will be more sewing projects to follow.


Friday, 8 February 2013

Sewing Machine 101

I can't really remember a time when I didn't have access to a sewing machine, but after a disastrous house move back in 1992, my machine got damaged and despite numerous attempts at getting it working properly again, I finally admitted defeat last year and replaced my machine.  The trouble is, its been so long since I was last able to successfully use my old machine, I've been putting off making use of my new one!  Finally enough was enough and I booked a one-to-one session at Kathy's Patch for me and my sewing machine to get to know each other.

Well I made it to my sewing machine 101 this morning, even though I was feeling more like crawling back into bed after sleeping badly last night. A lovely lady called Jo, took me through maintenance, threading, bobbin filling, all the stitches my machine can do and she finished up by showing me free-hand machine embroidery - something I've always wanted to try. The nice squiggly bit at the top was Jo's (she made it look SO easy) I found it a little harder to control but as my first squiggles looked a bit like a B, I had a go at my name. Jo said it was very good for a first attempt... I think I'm going to need a LOT more practice!  Marcus the bear came with me for some moral support as he enjoys trips out, meeting new people and having his photo taken.  Once the session was over I'm afraid I succumbed to a little fabric temptation, so I now have some beautiful fabrics for a couple of projects I want to try soon.  I also think it long be too long before I revisit this lovely shop!