Showing posts with label fabric. Show all posts

Sunday, 5 October 2014

The Bear Facts


Anyone who's read my blog will know that I love making miniature teddy bears.  They tend to be made intermittently depending on how well my hands are working.  I set myself a quota of at least 12 bears this year and even with everything else thats been going on, I've already achieved my goal, which has made me very happy!

I make my bears mainly for friends and family and usually have a number of people sitting patiently on my "Teddy To Do List".  When people reach the top of my list and if it's not a surprise gift, I often get asked the same questions, so this blog post is being written to address some of those queries.

Funnily enough I find miniature bears easier to sew than large ones - my left hand doesn't work as well as my right, so the smaller pieces are easier to hold than bigger bear bits and I can turn the small cotter pins I use for the neck joints, where I find the large ones impossible.  I also enjoy the challenge of working at this small scale.  I like to make sure my bears are as good as I can possibly make them so they are all hand sewn with extra strong thread and a lot of love.


I currently use three types of fabric for the main body of my bears.  All are made from synthetic fibres, as is the Ultrasuede fabric I use for the paws.  I use one basic teddy pattern which has a very traditional look and creates a bear who is approximately 8cm (3 1/4 inches) tall.  I have plans to create kitty and bunny patterns in the future, I just haven't got around to the drawing stage yet - thats on another To Do List.

1.  Cashmere
This fabric has the shortest pile but has a very touchable, soft and velvety feel, and it usually comes in a huge variety of colours...

   
Percy & Milly (made for a Hello Kitty fan) are both made from cashmere 


2.  English Velvet
I can't source this fabric anywhere at the moment.  I was lucky enough to be able to buy a small batch of this fabric a couple of years ago from a supplier who was retiring.  It has a longer pile than the cashmere and a slightly bristlier texture, though still very stroke-able.  I have much more limited colours in this, mainly natural browns and beiges, some slightly more golden shades, plus a green, a blue and a rose pink...

 
William & Raphael are both made from English velvet

3.  Sassy
This has the longest pile I currently work with.  It was developed in America specifically for miniature bears, it comes three types - frosty; long pile; and smoky - and a wide range of colours.

 
Bai & Clarabelle are both made from Sassy long pile

Frosted Sassy has a lot of colour in the base fabric but very little in the actual fur - Bai's arms, legs and ears are made from frosted fabric although as she's quite a light colour, the effect isn't too noticeable in her photo.  All coloured Sassy fabrics have been hand dyed (not by me - at least not yet...), except the white long pile and the natural grey smokey.

Sassy smokey has a dark base fabric which gives a different look, in the photo below you can see two bears - Pumpkin, who is made from cashmere and Greta, who is made from Sassy smoky, so its a good photo to see the differences in the different types of fabric...


I make a rule of never combining different types of fabric, but of course I do on occasion break my own rules - I was lucky with Sidney that it worked out, but I don't generally recommend mixing like this...


Sidney is made from a mixture of a leopard printed cashmere and an English velvet like fabric, both of which I don't seem to be able to find anymore, though I currently have a few remnants left.  And once in a while, I'll pick up a different piece of fabric, like I used for Herbert here...


I hope this post will help my friends to choose their new teddy bear friends.  At some point I'll do another post with some of the fabric colours I have in my stash and add a link on here.  If anyone has anymore questions, please feel free to ask.

Monday, 25 November 2013

A Year of Happy - 4/52

Well I haven't ventured out much this week, the weather has been mostly cold, wet and miserable but its been quite a good week for ticking a few people off my Christmas present list which I'm very happy about.

When I decided I would like to hand craft all my presents this year, I didn't take into consideration just how much time and energy it would take, so as time is passing, I have cheated and bought a few presents but I'm happy that I've also made use of some of the crafting materials I have on hand and this week I've enjoyed the challenge of turning some of them into gifts.  So all my happies for this week are crafting related...


My first happy is that I finished my Secret Santa gift this week!  Obviously I can't give you any details about this one right now as it might spoil the surprise if my SS recipient sees it, but there was a great sense of achievement when it was done.  You might also notice I had another little play with my question mark illustration on Photoshop during the week too - I wanted to make it look a bit more interesting.


My second happy is a pair of cushions I've made for my eldest niece and nephew who recently bought a house between them as a way onto the housing ladder.  They have a mid-grey sofa with green piping so I've made these out of a piece of fabric I bought earlier this year.  The fabric design sometimes makes me think of a coastal scene and at other times it makes me think of Venice - either way, I knew I wanted to decorate the cushions with "bunting".  I bought half a yard/metre if this fabric, which was enough for two cushion fronts but not the backs, luckily the strip I cut off the top of the fabric, was wide enough to decorate the back...


I used a simple pillowcase construction and attached the strip to the edge of the top flap, the rest of the back was cut from a large piece of cream cotton I bought I few years ago and never used.  The "bunting" is made from the cream fabric too, I wanted to keep it plain so it didn't distract from the lovely green fabric.  I was also incredibly lucky with how the back strip worked out - just enough to be able to place the buildings at the top and some boats at the bottom.


I did the stitching with a mid-grey cotton which will hopefully match with the sofa.  I'd never done machine applique before - it was a little scary but I'm pleased with how it turned out.  One last photo...


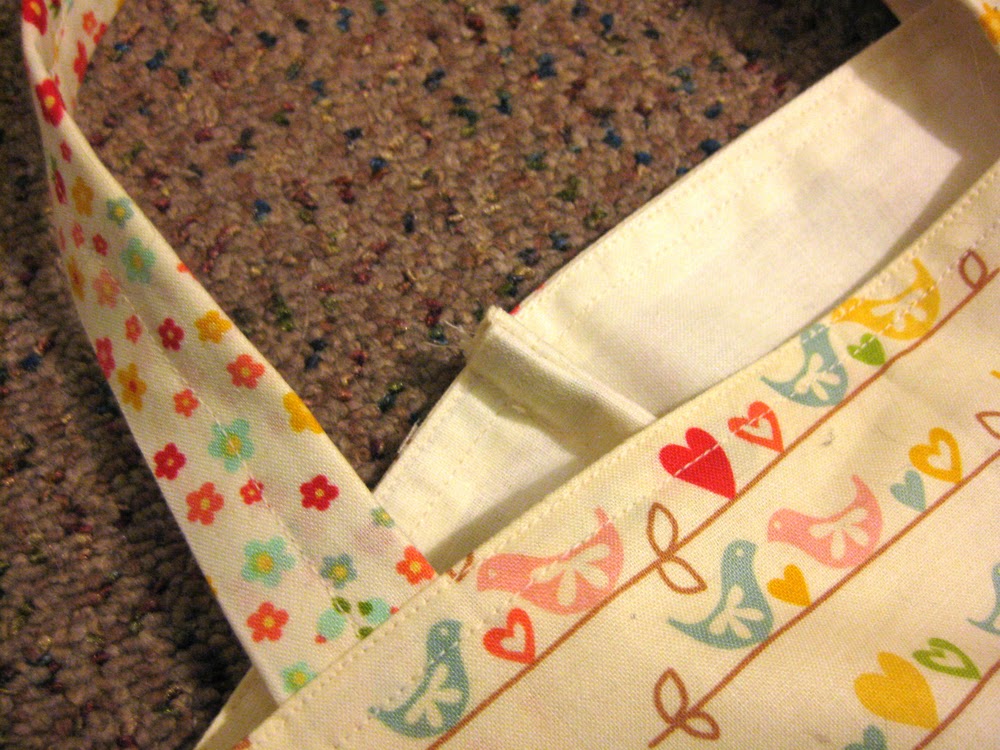
My last Happy is a bag I've made for a friend of mine - she loves environmentally friendly shopping bags.  She's also a quilter so the bag needed to be really well made...


I used some more of the cream fabric and added a border of a pretty birdie fabric which I used as inspiration for the machine applique I used on the front.  This shape wasn't as easy to sew around and it wasn't as easy to see what I was doing as the colours were so similar.  The handles are reinforced with webbing and sewn in about 5 times on each end, while the side seams are double sewn so all the raw edges are hidden (I have no idea what that type of seam is called).  The bag itself is made from a single piece of fabric which will hopefully make the bag stronger and give my friend a reasonable amount of use out of it.

Hopefully I haven't spoiled any surprises here as I'm reasonably confident that my niece, nephew and friend don't read my blog.  If any of them come across this before Christmas Day, then please accept my apologies, but I was just so happy with what I've made this week that I really wanted to share  :)

Sunday, 27 October 2013

Printing Workshop 1 - Image Transfer

A few weeks ago, I attended a one day workshop at Broadstairs Adult Education Centre - "Screen Printing and Image Transfer".

I'd started glancing through the available courses because partly I was feeling a little lost after realising I needed to take another year out before going back to University, but I've also been suffering from a major case of creative block lately, so I was looking for some inspiration too.  One of the modules I've already studied as part of my photography degree was called "Photography in Context" it was a brilliant module which really encouraged the students to think outside the box and made me realise you could do an awful lot of different and creative things with photography - and we didn't even do anything like this either!

We started off working on the image transfer part of the workshop as this would take longer to dry, it's also the part of the workshop I took the most photos of...


1.  We first stapled the calico fabric to a drawing board, then cut out the photocopy the tutor gave us, right up to the edge of the picture  (everyone had the same image)


2.  Drawing corner guide marks on the fabric with the image face down as it will be stuck to the fabric that way.


3.  Painting an undercoat of watered down white matt emulsion onto the fabric - I chose to make mine a little rough and ready so the fabric would show through here and there.


4.  Speeding up the drying process a little!


5.  Tracing out some of the features of the photocopy - not forgetting to add corner guide marks so everything will line up later on.


6.  Positioned using the guide marks, then transferring the traced lines onto the fabric.


7.  Hopefully you can see the traced lines in this photo  (sorry about the picture quality but these were taken using a mobile phone).


8.  Underpainting the image in colours that should give the finished artwork a Warhol-esque style.


9.  Placing the photocopy onto foil to stop it sticking to the wrong things while painting on the image transfer medium.


10.  I didn't take a photo of the process of painting on the medium and placing the photocopy face down on the fabric, using the corner marks as a guide because I needed both hands for the job.  But here you can see the tutor's hand showing me how to cover the image and gently remove any air bubbles that may have formed as the whole image needs to be in contact with the fabric or the transfer won't work properly.


11.  And now we have to wait patiently until everything is completely dry... Oh look!  It was nearly time for lunch  :)


12.  I chose to remove my piece from the board to speed up the drying process but if have the time to wait, its actually a lot easier to leave it in place for the next stage.


13.  You need to gently wet the paper and VERY gently, using the heel of you hand in light circular movements, rub the surface paper away.  This does take some time, but its better to take it slow and steady as you don't want to do any damage to the picture underneath, which is quite fragile.  I have to say I did cause a little bit of damage to mine as I was impatient (you can see the missing bottom right-hand corner) - but it was very exciting to see the image emerge!  I didn't actually finish this stage at the workshop; after it had dried, you could see more paper fibres so I had a second go at it at home.


14.  After you have removed as much of the paper fibres as you can, you need to seal the finished piece with some matt acrylic varnish - I didn't have any, so I used some PVA glue mixed with water at about a 1:1 ratio and it worked very well.  I also used the PVA mixture to stick my fabric to a piece of mount board which gave more stability to the areas where I'd rubbed too hard, it also means my piece is now ready for a frame, which I hope to get very soon.

So there you have it!  One image transfer with under-painted colour.  I really enjoyed making this and it's given me lots of ideas for doing things with my own photos.  So as soon as I can put together all the equipment I need - watch this space!

It took me the best part of a fortnight to recover from taking part in this workshop, but I got so much out of it, that it was worth it.  I'll post some details about the screen printing part of the workshop another day.

Tuesday, 23 April 2013

Felt Book Mark

I love reading, though over the past few years I've mostly been reading books related to my photography studies which has left very little energy or enthusiasm for fiction.  But one thing my studies have taught me is that you can never have too many bookmarks, particularly when working on essays and assignments.

Recently I've noticed some lovely bookmarks on Pinterest and decided I would have a go at creating my own version - its also a great way of using up some of the random ribbons and tapes in my sewing box and the felt scraps I'm starting to accumulate.  I used about 18 inches of tape for this one - which sounds like a lot for a bookmark but it means both felt decorated ends extend below the bottom of a paperback or hardback novel so if you keep one end tucked inside the back of your book, its handy for when you need to drag yourself away.  Its a great length for marking pages in bigger text books too.  I also used a couple of buttons for the flowers and a couple of seed beads for the eyes on the bird.  I die cut these shapes but it would be easy enough to hand cut small shapes too.

They are also quite quick and easy to make, so I think I'll be making more of these.


I chose to vary the colours on each side for extra interest.

Wednesday, 17 April 2013

Necessity Breeds Invention!

I was always very impressed as a child that my Grandmother seemed to have a saying for every circumstance and the one in the title is what popped into my head when I was making this bag (it seemed appropriate to photograph it on the beach given my choice of fabric).


Since I've had to start using crutches instead of a walking stick when I go out I've discovered a problem - it's very difficult to juggle a crutch and a carrier bag!  I tried digging out an old rucksack as the hospital suggested but I found it hard to get on and off as my left arm doesn't work too well either.  So the answer seemed to be to find a bag that would fit across the body, that wasn't so wide that it would get in the way, but that was also big enough to carry my usual bits - purse, phone etc., and any odd bits of shopping you might pick up when out and about - such as the local paper, a craft magazine, a library book or a pint of milk.  I thought that such an item would be easy to find... sadly not, so I decided I would have to make my own.  I spent some time looking for a suitable pattern but in the end I had to create that too - using pages from my local newspaper.


My original idea had been to use the beach hut fabric on the outside, make a plainer flap with something appliqued on it and line the bag with the seagull fabric, but I couldn't bear to hide the seagull fabric away, so in the end I used a plain calico for the lining.  The bag is also padded so it will protect my DSLR nicely too.


I also added a loop and lobster clip on the inside so I could attach my purse lanyard for security - plus it gave me an excuse for using some of this lovely ribbon I picked up in my local craft shop!


The handles were triple stitched for strength as I want my bag to last as long as possible.  All that was needed then to finish it off was a button.  I mentioned yesterday about the button... up to this point, all my decisions had been relatively easy so I never would have dreamed that choosing a button would be so hard!  In the end there was me, my friend and the shop assistant involved in its selection and we must have looked at dozens upon dozens of buttons before a final choice was made.


I'm still not totally convinced, but I think thats probably only because I'd previously found the "perfect button" in my button tin - only it was the wrong size for the loop I'd made and I couldn't find anything else that resembled it, this button really does work very well with the blues in the beach hut fabric so I'm sure I'll grow to love it too in time.


Monday, 15 April 2013

DIY Pincushion

Its been quite some time since I last posted a project on here - sorry but I've been distracted by a lot of other things going on in my life, I have made a few items lately, so hopefully I can share them with you over the next few posts.  I have no idea who - if anyone - reads this, but if you do, it would be great if you left a comment.

Last year a friend lent me a pincushion that attached to the wrist while I was working on a sewing project, it was really useful but I discovered that to get one of my own could also prove to be quite expensive, so I thought there was no reason why I couldn't make my own.  I bought my self a fat quarter of fabric, a piece of co-ordinating felt, some matching embroidery thread and a packet of elastic - the total cost wasn't really all that different in the end to the cost of a bought pincushion but I had great fun planning what I was going to do and it was the first time I'd ever tried die-cutting felt so I also had the excitement of discovering how effective that was too!

I actually cut my pincushion out and embroidered the hearts onto the fabric last year but then came to a halt because at that time, I still hadn't plucked up the courage to try out my new sewing machine.  The machine has been sitting on the dining table for a few days and today I finally decided it needed moving... but then thought it would be a good idea to finish a couple of outstanding projects first.  It actually only took a few minutes to sew around the pincushion - trouble was I'd under estimated how much elastic I would need for my (rather chubby) wrist as once I'd turned it out and slid in a piece of repurposed plastic (to prevent accidental pin acupuncture) and stuffed it, the elastic was tighter than I'd anticipated.  Luckily, I'd prepared two pincushions ready for sewing so made sure my second attempt was a better fit and in fact its currently in my teddy workbox already being put to good use.  :)


The pincushions are a very simple design, were really easy to make and I have loads of fabric left so I might make a few more as Christmas gifts for some of my crafting friends or I might use some of the other fabrics I've bought since or perhaps next time I'll make something more ambitious as I've seen some absolutely wonderful ideas for pincushions on Pinterest - but this one was designed with a particular task in mind and it does exactly what I needed it to do so I'm happy.

I have to admit I now regret that I gave away my old fabric stash a few years ago when it became obvious my old sewing machine was never going to work properly again, but the fabric did go to a good home and the fabric designs I've seen since I started looking again over about the last 10 months, are just SO beautiful that I have given into temptation a few times, so hopefully there will be more sewing projects to follow.