One of my new neighbours recently sent out a request for help - she wants to do "Elf on the Shelf" with her young daughter this year and needed an Elf. I waited a little while to see if anyone else would respond, and then suggested I'd be prepared to help if she was stuck.
My neighbour found a rag doll that could be converted so I didn't have to start from scratch. The first thing I did was create a pair of elf ears - I think elves should have a proper set of pointy ears. I had some dark cream fabric but it wasn't quite dark enough so I brushed an ink pad across the fabric to darken it, then washed it to lighten it again slightly before ironing to heat set it. I then 'amputated' the arms and legs so I could add some armature wire as I thought this would make it easier for the elf to get up to all his elf-related activities. I decided to transplant/create a new set of legs as I wanted to give the elf proper curly toed shoes. I wish now that I'd taken photos all the way through the transformation but sadly I didn't think of it, so I just have a few photos to share with you... here are the old legs alongside the new ones.
I've never actually designed elf shoes before, but then I haven't designed elf clothes - or any other type of clothes before, but I have a book - "Just Like Me Knits" by Brandy Fortune - that gives some great hints on pattern making for dolls. It has some great sewing and knitting patterns for dolls too but sadly I'm pretty useless at knitting, so those patterns currently remain untried. Below is a photo of the original clothes...
I was lucky with the elf trousers as I've made a couple of rag dolls in recent months and I was able to adapt the bloomers pattern to make a pair of trousers with a slightly tapered leg, that amazingly fit without alteration. The jacket I decided to design from scratch, based on the doll's measurements, as the Elf is a slightly different shape to the rag dolls I've made, I kept the shape simple but I still think I owe Brandy a BIG "Thank You" for all the tips in her book, as the jacket was a pretty good fit too - I just had to adjust the neck opening but as I was using felt, this was a simple matter of trimming to get a better shape. Here's a photo of Mabel, the rag doll I made recently, who is rather cheekily flashing her bloomers... it's surprising how many people have a sneaky look at her bloomers when they meet her so she decided to show them off for everyone to see!
The hat was straightforward as I've made a couple of clown hats for my bears before - I just had to make the pattern bigger - a LOT bigger! I decided to finish the hat off with a bell, none of the bells in my stash was big enough, but Clare from The Summerhouse By The Sea, had a great suggestion and I'd like to thank my cat for donating a bell from one of his toys (I've since replaced it - also thanks to Clare x) Here is a photo of the finished Elf...
It's really nice to have something ticked off my To-Do list, which seems to have grown lately instead of getting shorter, which is quite scary when it feels as though Christmas is approaching at breakneck speed!
Showing posts with label new skills. Show all posts
Saturday, 22 November 2014
Saturday, 8 February 2014
Glass Fusing
Last weekend I attended a morning workshop which taught the skills of glass fusing. The process of fusing glass in a kiln takes too long for us to have been able to see it happen, but our tutor talked us through the process of both fusing glass fully, and tack fusing. She took us through all the health and safety precautions we needed to know about, the properties of and the different types of glass. She showed us some examples of jewellery pieces she had made, and then she let us loose to make our own pieces.
Yesterday I received an e-mail letting me know that my work was ready for collection, so I just HAD to go and get it straight away - I couldn't bear to wait for someone to collect it for me once I knew it was ready!
Some of my pieces turned out just as I'd imagined them, while others produced rather more unexpected results. I'd put together seven pieces and chose to have some fully fused and some tack fused. I some cases making a couple similar items and having one fused one way and one the other...
This was my first piece - I spent ages cutting small pieces of glass to fit! Despite the tutor explaining how glass reacts in the kiln, I didn't really expect it to change shape so drastically! I think it now resembles a kind of glass boomerang! I'm thinking that I might have a go at wire wrapping this piece so I can hang it in my window as the colours are pretty even if the shape is a little strange!
My second piece was tack fused and has maintained it's original shape with less rounding of the edges. The finish is not as smooth but I love the shape and texture.
Again with these pieces, one was tacked and the other was fully fused, this time using opalescent glass instead of translucent - and again, I prefer the piece that retains some of the shape of the original glass.
However with my last piece, it had to be fully fused and I love it. It's a combination of opalescent and fracture and streamer glass with small pieces of copper foil sandwiched between...
The photos above show the before and after fusing, the light here today has been very changeable and I don't think any of the photos do justice to what the glass looks like in reality. The copper turned a deep red just as the tutor said it would. I had a feeling this was going to be my favourite piece when I was making it and it really is... I'm now waiting impatiently for some suitable glue to arrive so I can attach a bail and start wearing it!
The last piece I made was similar to this but I sandwiched some knitted wire in the middle and tried cut a small piece of copper in the shape of a bird - not easy to do with a very big pair of scissors! Sadly something went wrong in the kiln and the top piece of glass moved before it fused which is a shame...
I think I've learned just as much, if not more, from what didn't work as I have from what did. I'm now looking around for other courses so I can learn more. I've always loved working with glass and was upset when I had to stop working with stained glass when my hands started playing up. But working at this scale is so much easier - I find smaller bears put less strain on my hands too. So maybe one day I'll be working with glass again - that definitely makes my happy list! :)
Yesterday I received an e-mail letting me know that my work was ready for collection, so I just HAD to go and get it straight away - I couldn't bear to wait for someone to collect it for me once I knew it was ready!
Some of my pieces turned out just as I'd imagined them, while others produced rather more unexpected results. I'd put together seven pieces and chose to have some fully fused and some tack fused. I some cases making a couple similar items and having one fused one way and one the other...
My second piece was tack fused and has maintained it's original shape with less rounding of the edges. The finish is not as smooth but I love the shape and texture.
Again with these pieces, one was tacked and the other was fully fused, this time using opalescent glass instead of translucent - and again, I prefer the piece that retains some of the shape of the original glass.
However with my last piece, it had to be fully fused and I love it. It's a combination of opalescent and fracture and streamer glass with small pieces of copper foil sandwiched between...
The photos above show the before and after fusing, the light here today has been very changeable and I don't think any of the photos do justice to what the glass looks like in reality. The copper turned a deep red just as the tutor said it would. I had a feeling this was going to be my favourite piece when I was making it and it really is... I'm now waiting impatiently for some suitable glue to arrive so I can attach a bail and start wearing it!
The last piece I made was similar to this but I sandwiched some knitted wire in the middle and tried cut a small piece of copper in the shape of a bird - not easy to do with a very big pair of scissors! Sadly something went wrong in the kiln and the top piece of glass moved before it fused which is a shame...
I think I've learned just as much, if not more, from what didn't work as I have from what did. I'm now looking around for other courses so I can learn more. I've always loved working with glass and was upset when I had to stop working with stained glass when my hands started playing up. But working at this scale is so much easier - I find smaller bears put less strain on my hands too. So maybe one day I'll be working with glass again - that definitely makes my happy list! :)
Sunday, 2 February 2014
A 7th Week of Happiness...
It's obviously going to take me longer than a year to get through this as some weeks I don't feel well enough to blog, but I don't think that really matters - its about changing the way you think, its about looking for things that make you smile, even if they are small things and sometimes even in the face of adversity! I think those are the times when it's even more important to find something positive to be thankful for.
This week, it's been pretty easy to find things to be happy about - it was my birthday a few days ago and I've been overwhelmed by the kindness of others, especially as I haven't been very good at keeping track of other peoples birthdays over the past few years, which is something I really need to work on. The two shelves above my television are crowded with beautiful birthday cards which make me smile every time I look at them, they are a reminder that I am fortunate to have some wonderful friends and family. :)
On my birthday I had lunch with two friends I've known since I was 8 years old, we went to a lovely little cafe in an ex-coastguard station perched on top of the cliffs in the village where we grew up. It was pretty cold and blustery so I took a photo of our view across the English Channel through the window from the comfort of our table in the tearoom...
I've noticed that every few years, I go down to the Bay on my birthday, so here is a photo from this year's visit...
It's the first time I've been out with my "big camera" for ages and it actually felt pretty good to be taking proper photos again :)
I've completed my bear for January thanks to a small piece of pale green sheer fabric from one of my friends which I used for one side of the wings. The bear is going in an exhibition at my local library next week which is being put on by the craft club I attend there once a fortnight. Being a library based group we took some of our inspiration from books and this little bear is my take on Tinkerbell from Peter Pan...
Yesterday, I went to a morning workshop on making fused glass jewellery. It's a shame that I can't find any cool courses like this locally but this one took place in the town where my sister lives so it was a great opportunity to spend some time with family. It was a long and tiring day but absolutely wonderful and I don't even care that I can barely move today!
Years ago, I used to enjoy making things from stained glass until my hands started playing up to much, but was pleased to discover yesterday that I remembered how to cut glass successfully and as I've found with my bear-making, cutting small pieces is a lot easier. It'll probably be a few weeks before I get my finished pieces back as firing glass takes too long to have got our pieces back the same day so I'm waiting very impatiently and with great excitement to see what the finished result will look like.
The photo above shows one of the pieces I'm most excited about. The tutor told us that pieces of copper turn a beautiful deep burnished red when sandwiched between two pieces of glass. I wanted to try this and chose a piece of white glass for the background, with a piece of "fracture and streamer" glass on top. I thought the top piece I cut reminded me of reeds or tall grasses so I cut some tiny leaf shapes from the copper. I'll post more pictures once I get my finished pieces back.
This week, it's been pretty easy to find things to be happy about - it was my birthday a few days ago and I've been overwhelmed by the kindness of others, especially as I haven't been very good at keeping track of other peoples birthdays over the past few years, which is something I really need to work on. The two shelves above my television are crowded with beautiful birthday cards which make me smile every time I look at them, they are a reminder that I am fortunate to have some wonderful friends and family. :)
On my birthday I had lunch with two friends I've known since I was 8 years old, we went to a lovely little cafe in an ex-coastguard station perched on top of the cliffs in the village where we grew up. It was pretty cold and blustery so I took a photo of our view across the English Channel through the window from the comfort of our table in the tearoom...
I've noticed that every few years, I go down to the Bay on my birthday, so here is a photo from this year's visit...
It's the first time I've been out with my "big camera" for ages and it actually felt pretty good to be taking proper photos again :)
I've completed my bear for January thanks to a small piece of pale green sheer fabric from one of my friends which I used for one side of the wings. The bear is going in an exhibition at my local library next week which is being put on by the craft club I attend there once a fortnight. Being a library based group we took some of our inspiration from books and this little bear is my take on Tinkerbell from Peter Pan...
Yesterday, I went to a morning workshop on making fused glass jewellery. It's a shame that I can't find any cool courses like this locally but this one took place in the town where my sister lives so it was a great opportunity to spend some time with family. It was a long and tiring day but absolutely wonderful and I don't even care that I can barely move today!
Years ago, I used to enjoy making things from stained glass until my hands started playing up to much, but was pleased to discover yesterday that I remembered how to cut glass successfully and as I've found with my bear-making, cutting small pieces is a lot easier. It'll probably be a few weeks before I get my finished pieces back as firing glass takes too long to have got our pieces back the same day so I'm waiting very impatiently and with great excitement to see what the finished result will look like.
The photo above shows one of the pieces I'm most excited about. The tutor told us that pieces of copper turn a beautiful deep burnished red when sandwiched between two pieces of glass. I wanted to try this and chose a piece of white glass for the background, with a piece of "fracture and streamer" glass on top. I thought the top piece I cut reminded me of reeds or tall grasses so I cut some tiny leaf shapes from the copper. I'll post more pictures once I get my finished pieces back.
Labels:
beach,
bear,
birthdays,
Craft Club,
family,
friends,
fun,
glass fusing,
handmade,
jewellery,
learning,
new skills,
photography,
resolutions,
teddy,
teddybear,
White Cliffs of Dover,
workshop,
year of happy
Monday, 25 November 2013
A Year of Happy - 4/52
Well I haven't ventured out much this week, the weather has been mostly cold, wet and miserable but its been quite a good week for ticking a few people off my Christmas present list which I'm very happy about.
When I decided I would like to hand craft all my presents this year, I didn't take into consideration just how much time and energy it would take, so as time is passing, I have cheated and bought a few presents but I'm happy that I've also made use of some of the crafting materials I have on hand and this week I've enjoyed the challenge of turning some of them into gifts. So all my happies for this week are crafting related...
My first happy is that I finished my Secret Santa gift this week! Obviously I can't give you any details about this one right now as it might spoil the surprise if my SS recipient sees it, but there was a great sense of achievement when it was done. You might also notice I had another little play with my question mark illustration on Photoshop during the week too - I wanted to make it look a bit more interesting.
My second happy is a pair of cushions I've made for my eldest niece and nephew who recently bought a house between them as a way onto the housing ladder. They have a mid-grey sofa with green piping so I've made these out of a piece of fabric I bought earlier this year. The fabric design sometimes makes me think of a coastal scene and at other times it makes me think of Venice - either way, I knew I wanted to decorate the cushions with "bunting". I bought half a yard/metre if this fabric, which was enough for two cushion fronts but not the backs, luckily the strip I cut off the top of the fabric, was wide enough to decorate the back...
I used a simple pillowcase construction and attached the strip to the edge of the top flap, the rest of the back was cut from a large piece of cream cotton I bought I few years ago and never used. The "bunting" is made from the cream fabric too, I wanted to keep it plain so it didn't distract from the lovely green fabric. I was also incredibly lucky with how the back strip worked out - just enough to be able to place the buildings at the top and some boats at the bottom.
I did the stitching with a mid-grey cotton which will hopefully match with the sofa. I'd never done machine applique before - it was a little scary but I'm pleased with how it turned out. One last photo...
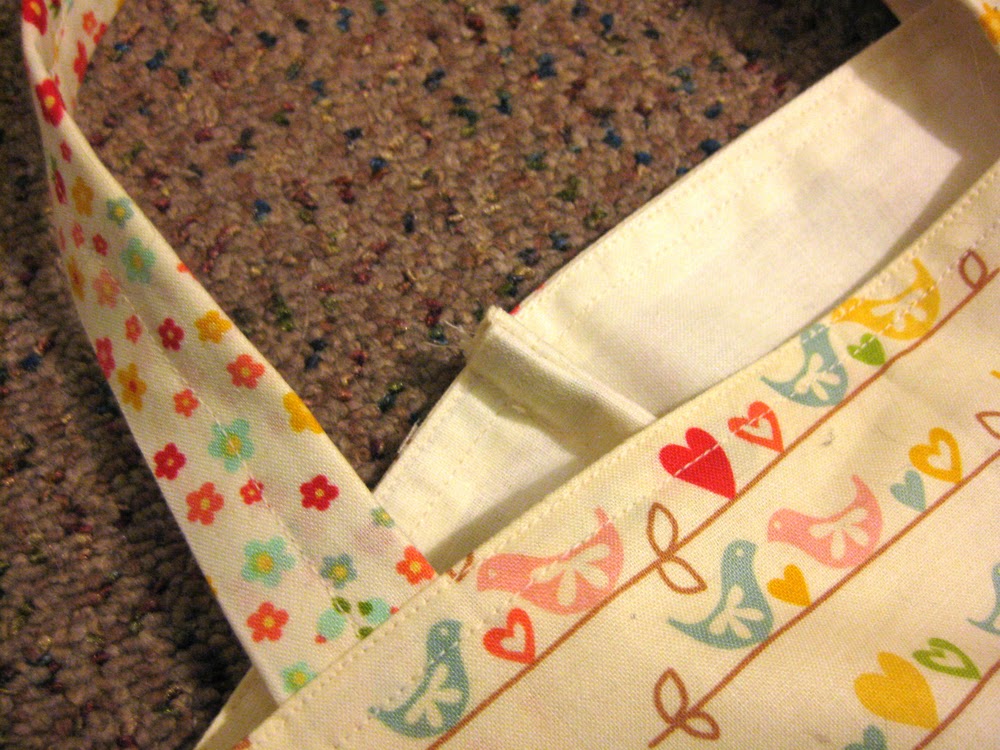
My last Happy is a bag I've made for a friend of mine - she loves environmentally friendly shopping bags. She's also a quilter so the bag needed to be really well made...
I used some more of the cream fabric and added a border of a pretty birdie fabric which I used as inspiration for the machine applique I used on the front. This shape wasn't as easy to sew around and it wasn't as easy to see what I was doing as the colours were so similar. The handles are reinforced with webbing and sewn in about 5 times on each end, while the side seams are double sewn so all the raw edges are hidden (I have no idea what that type of seam is called). The bag itself is made from a single piece of fabric which will hopefully make the bag stronger and give my friend a reasonable amount of use out of it.
Hopefully I haven't spoiled any surprises here as I'm reasonably confident that my niece, nephew and friend don't read my blog. If any of them come across this before Christmas Day, then please accept my apologies, but I was just so happy with what I've made this week that I really wanted to share :)
When I decided I would like to hand craft all my presents this year, I didn't take into consideration just how much time and energy it would take, so as time is passing, I have cheated and bought a few presents but I'm happy that I've also made use of some of the crafting materials I have on hand and this week I've enjoyed the challenge of turning some of them into gifts. So all my happies for this week are crafting related...
My first happy is that I finished my Secret Santa gift this week! Obviously I can't give you any details about this one right now as it might spoil the surprise if my SS recipient sees it, but there was a great sense of achievement when it was done. You might also notice I had another little play with my question mark illustration on Photoshop during the week too - I wanted to make it look a bit more interesting.
My second happy is a pair of cushions I've made for my eldest niece and nephew who recently bought a house between them as a way onto the housing ladder. They have a mid-grey sofa with green piping so I've made these out of a piece of fabric I bought earlier this year. The fabric design sometimes makes me think of a coastal scene and at other times it makes me think of Venice - either way, I knew I wanted to decorate the cushions with "bunting". I bought half a yard/metre if this fabric, which was enough for two cushion fronts but not the backs, luckily the strip I cut off the top of the fabric, was wide enough to decorate the back...
I used a simple pillowcase construction and attached the strip to the edge of the top flap, the rest of the back was cut from a large piece of cream cotton I bought I few years ago and never used. The "bunting" is made from the cream fabric too, I wanted to keep it plain so it didn't distract from the lovely green fabric. I was also incredibly lucky with how the back strip worked out - just enough to be able to place the buildings at the top and some boats at the bottom.
I did the stitching with a mid-grey cotton which will hopefully match with the sofa. I'd never done machine applique before - it was a little scary but I'm pleased with how it turned out. One last photo...
My last Happy is a bag I've made for a friend of mine - she loves environmentally friendly shopping bags. She's also a quilter so the bag needed to be really well made...
I used some more of the cream fabric and added a border of a pretty birdie fabric which I used as inspiration for the machine applique I used on the front. This shape wasn't as easy to sew around and it wasn't as easy to see what I was doing as the colours were so similar. The handles are reinforced with webbing and sewn in about 5 times on each end, while the side seams are double sewn so all the raw edges are hidden (I have no idea what that type of seam is called). The bag itself is made from a single piece of fabric which will hopefully make the bag stronger and give my friend a reasonable amount of use out of it.
Hopefully I haven't spoiled any surprises here as I'm reasonably confident that my niece, nephew and friend don't read my blog. If any of them come across this before Christmas Day, then please accept my apologies, but I was just so happy with what I've made this week that I really wanted to share :)
Sunday, 27 October 2013
Printing Workshop 1 - Image Transfer
A few weeks ago, I attended a one day workshop at Broadstairs Adult Education Centre - "Screen Printing and Image Transfer".
I'd started glancing through the available courses because partly I was feeling a little lost after realising I needed to take another year out before going back to University, but I've also been suffering from a major case of creative block lately, so I was looking for some inspiration too. One of the modules I've already studied as part of my photography degree was called "Photography in Context" it was a brilliant module which really encouraged the students to think outside the box and made me realise you could do an awful lot of different and creative things with photography - and we didn't even do anything like this either!
We started off working on the image transfer part of the workshop as this would take longer to dry, it's also the part of the workshop I took the most photos of...
1. We first stapled the calico fabric to a drawing board, then cut out the photocopy the tutor gave us, right up to the edge of the picture (everyone had the same image)
2. Drawing corner guide marks on the fabric with the image face down as it will be stuck to the fabric that way.
3. Painting an undercoat of watered down white matt emulsion onto the fabric - I chose to make mine a little rough and ready so the fabric would show through here and there.
4. Speeding up the drying process a little!
5. Tracing out some of the features of the photocopy - not forgetting to add corner guide marks so everything will line up later on.
6. Positioned using the guide marks, then transferring the traced lines onto the fabric.
7. Hopefully you can see the traced lines in this photo (sorry about the picture quality but these were taken using a mobile phone).
8. Underpainting the image in colours that should give the finished artwork a Warhol-esque style.
9. Placing the photocopy onto foil to stop it sticking to the wrong things while painting on the image transfer medium.
10. I didn't take a photo of the process of painting on the medium and placing the photocopy face down on the fabric, using the corner marks as a guide because I needed both hands for the job. But here you can see the tutor's hand showing me how to cover the image and gently remove any air bubbles that may have formed as the whole image needs to be in contact with the fabric or the transfer won't work properly.
13. You need to gently wet the paper and VERY gently, using the heel of you hand in light circular movements, rub the surface paper away. This does take some time, but its better to take it slow and steady as you don't want to do any damage to the picture underneath, which is quite fragile. I have to say I did cause a little bit of damage to mine as I was impatient (you can see the missing bottom right-hand corner) - but it was very exciting to see the image emerge! I didn't actually finish this stage at the workshop; after it had dried, you could see more paper fibres so I had a second go at it at home.
14. After you have removed as much of the paper fibres as you can, you need to seal the finished piece with some matt acrylic varnish - I didn't have any, so I used some PVA glue mixed with water at about a 1:1 ratio and it worked very well. I also used the PVA mixture to stick my fabric to a piece of mount board which gave more stability to the areas where I'd rubbed too hard, it also means my piece is now ready for a frame, which I hope to get very soon.
So there you have it! One image transfer with under-painted colour. I really enjoyed making this and it's given me lots of ideas for doing things with my own photos. So as soon as I can put together all the equipment I need - watch this space!
It took me the best part of a fortnight to recover from taking part in this workshop, but I got so much out of it, that it was worth it. I'll post some details about the screen printing part of the workshop another day.
I'd started glancing through the available courses because partly I was feeling a little lost after realising I needed to take another year out before going back to University, but I've also been suffering from a major case of creative block lately, so I was looking for some inspiration too. One of the modules I've already studied as part of my photography degree was called "Photography in Context" it was a brilliant module which really encouraged the students to think outside the box and made me realise you could do an awful lot of different and creative things with photography - and we didn't even do anything like this either!
We started off working on the image transfer part of the workshop as this would take longer to dry, it's also the part of the workshop I took the most photos of...
1. We first stapled the calico fabric to a drawing board, then cut out the photocopy the tutor gave us, right up to the edge of the picture (everyone had the same image)
2. Drawing corner guide marks on the fabric with the image face down as it will be stuck to the fabric that way.
3. Painting an undercoat of watered down white matt emulsion onto the fabric - I chose to make mine a little rough and ready so the fabric would show through here and there.
4. Speeding up the drying process a little!
5. Tracing out some of the features of the photocopy - not forgetting to add corner guide marks so everything will line up later on.
6. Positioned using the guide marks, then transferring the traced lines onto the fabric.
7. Hopefully you can see the traced lines in this photo (sorry about the picture quality but these were taken using a mobile phone).
8. Underpainting the image in colours that should give the finished artwork a Warhol-esque style.
9. Placing the photocopy onto foil to stop it sticking to the wrong things while painting on the image transfer medium.
10. I didn't take a photo of the process of painting on the medium and placing the photocopy face down on the fabric, using the corner marks as a guide because I needed both hands for the job. But here you can see the tutor's hand showing me how to cover the image and gently remove any air bubbles that may have formed as the whole image needs to be in contact with the fabric or the transfer won't work properly.
11. And now we have to wait patiently until everything is completely dry... Oh look! It was nearly time for lunch :)
12. I chose to remove my piece from the board to speed up the drying process but if have the time to wait, its actually a lot easier to leave it in place for the next stage.
13. You need to gently wet the paper and VERY gently, using the heel of you hand in light circular movements, rub the surface paper away. This does take some time, but its better to take it slow and steady as you don't want to do any damage to the picture underneath, which is quite fragile. I have to say I did cause a little bit of damage to mine as I was impatient (you can see the missing bottom right-hand corner) - but it was very exciting to see the image emerge! I didn't actually finish this stage at the workshop; after it had dried, you could see more paper fibres so I had a second go at it at home.
14. After you have removed as much of the paper fibres as you can, you need to seal the finished piece with some matt acrylic varnish - I didn't have any, so I used some PVA glue mixed with water at about a 1:1 ratio and it worked very well. I also used the PVA mixture to stick my fabric to a piece of mount board which gave more stability to the areas where I'd rubbed too hard, it also means my piece is now ready for a frame, which I hope to get very soon.
So there you have it! One image transfer with under-painted colour. I really enjoyed making this and it's given me lots of ideas for doing things with my own photos. So as soon as I can put together all the equipment I need - watch this space!
It took me the best part of a fortnight to recover from taking part in this workshop, but I got so much out of it, that it was worth it. I'll post some details about the screen printing part of the workshop another day.
Wednesday, 3 July 2013
Inspired by Moby and Alice
Once a fortnight I attend a craft club at my local library and every so often we tackle a book related craft project. Our first project was based on Herman Melville's "Moby Dick" and our second and most recent has been Lewis Carroll's "Alice in Wonderland". Its entirely up to us as to how we interpret the theme, we just use the story or characters as our inspiration. The club has only been running for a few months so far, but its lovely to get together with other crafters, enjoy the company of like-minded people, learn from each other and it's great to see how everyone else interprets the themes.
I meant to blog about my Moby Dick themed project a few months ago, but looking back through the posts I've published, I've realised Moby got away from me somehow, so here he is now...
I still need to get some dowels so the wall hanging can actually be hung up, but I was quite pleased with the finished piece even though I've never tried anything like this before - at least not in felt! It made me realise my abilities to work a sewing machine need a lot more work, but it was fun to do. Some of my inspiration for this piece came not just from the book, but from a piece of stained glass that hangs in my bedroom window. Years ago before problems with my hands made it impossible to continue with the hobby, I used to love making things with stained glass and while most of the pieces I made were given away as presents, one of the pieces I will never part with is the glass panel in my bedroom. Although I can't see the sea from my window, it faces the sea which is about half a mile away and is roughly east facing so it catches the sunrise. Its not very often these days that I'm awake as the sun rises but I do love to watch dawn breaking when I'm able. I used black thread for all the stitching apart from attaching the beads and anchor at the bottom, it was a deliberate choice because I wanted to make the borders between the felt pieces stand out like the seams on a piece of stained glass - I just wish I'd managed to get them a bit neater!
Apologies for the bad photo, but this was just a quick snap of the glass panel taken on a very dull day! You've probably already noticed a few of them, but there are four fishes swimming around in the sea. Most of the panel is made from transparent water glass which is made with gentle ripples which gives a sense of movement; the seagull is made from opaque glass to make it stand out from its background.
My first thought for our current theme was to make a white rabbit, but I haven't yet got around to sitting down with pencil and paper to make a pattern for my bunny, I'm not giving up on the idea but I wanted to be able to produce something for our last meeting so I made a bracelet. I've had the card charms for some years and the bunny charms for a couple of months, though I did have to buy the rose charms and the dark grey/black glass pearls in order to put together the bracelet I had in mind. Several times I wasn't sure it would work out but after a couple of false starts I finally figured it out.
I have very chunky wrists so sadly the bracelet doesn't fit me, but one of my daintier friends has tried it on and I was pleased with how it looked on her. I could have made it bigger but it would have ruined the pattern, it was made for the exhibition we will eventually have at some point, so it doesn't really matter that it doesn't quite fit my wrist, it wasn't really intended for me anyway! One of these days I'll have to make a start on that bunny and maybe then I'll be able get the song "We're Painting The Roses Red" from the Disney film, that was the main inspiration for the bracelet, out of my head! :)
I meant to blog about my Moby Dick themed project a few months ago, but looking back through the posts I've published, I've realised Moby got away from me somehow, so here he is now...
I still need to get some dowels so the wall hanging can actually be hung up, but I was quite pleased with the finished piece even though I've never tried anything like this before - at least not in felt! It made me realise my abilities to work a sewing machine need a lot more work, but it was fun to do. Some of my inspiration for this piece came not just from the book, but from a piece of stained glass that hangs in my bedroom window. Years ago before problems with my hands made it impossible to continue with the hobby, I used to love making things with stained glass and while most of the pieces I made were given away as presents, one of the pieces I will never part with is the glass panel in my bedroom. Although I can't see the sea from my window, it faces the sea which is about half a mile away and is roughly east facing so it catches the sunrise. Its not very often these days that I'm awake as the sun rises but I do love to watch dawn breaking when I'm able. I used black thread for all the stitching apart from attaching the beads and anchor at the bottom, it was a deliberate choice because I wanted to make the borders between the felt pieces stand out like the seams on a piece of stained glass - I just wish I'd managed to get them a bit neater!
Apologies for the bad photo, but this was just a quick snap of the glass panel taken on a very dull day! You've probably already noticed a few of them, but there are four fishes swimming around in the sea. Most of the panel is made from transparent water glass which is made with gentle ripples which gives a sense of movement; the seagull is made from opaque glass to make it stand out from its background.
My first thought for our current theme was to make a white rabbit, but I haven't yet got around to sitting down with pencil and paper to make a pattern for my bunny, I'm not giving up on the idea but I wanted to be able to produce something for our last meeting so I made a bracelet. I've had the card charms for some years and the bunny charms for a couple of months, though I did have to buy the rose charms and the dark grey/black glass pearls in order to put together the bracelet I had in mind. Several times I wasn't sure it would work out but after a couple of false starts I finally figured it out.
I have very chunky wrists so sadly the bracelet doesn't fit me, but one of my daintier friends has tried it on and I was pleased with how it looked on her. I could have made it bigger but it would have ruined the pattern, it was made for the exhibition we will eventually have at some point, so it doesn't really matter that it doesn't quite fit my wrist, it wasn't really intended for me anyway! One of these days I'll have to make a start on that bunny and maybe then I'll be able get the song "We're Painting The Roses Red" from the Disney film, that was the main inspiration for the bracelet, out of my head! :)
Labels:
beach,
beads,
books,
bracelet,
felt,
handmade,
jewellery,
new skills,
reading,
seaside,
sew,
sewing machine
Wednesday, 17 April 2013
Necessity Breeds Invention!
I was always very impressed as a child that my Grandmother seemed to have a saying for every circumstance and the one in the title is what popped into my head when I was making this bag (it seemed appropriate to photograph it on the beach given my choice of fabric).
Since I've had to start using crutches instead of a walking stick when I go out I've discovered a problem - it's very difficult to juggle a crutch and a carrier bag! I tried digging out an old rucksack as the hospital suggested but I found it hard to get on and off as my left arm doesn't work too well either. So the answer seemed to be to find a bag that would fit across the body, that wasn't so wide that it would get in the way, but that was also big enough to carry my usual bits - purse, phone etc., and any odd bits of shopping you might pick up when out and about - such as the local paper, a craft magazine, a library book or a pint of milk. I thought that such an item would be easy to find... sadly not, so I decided I would have to make my own. I spent some time looking for a suitable pattern but in the end I had to create that too - using pages from my local newspaper.
My original idea had been to use the beach hut fabric on the outside, make a plainer flap with something appliqued on it and line the bag with the seagull fabric, but I couldn't bear to hide the seagull fabric away, so in the end I used a plain calico for the lining. The bag is also padded so it will protect my DSLR nicely too.
I also added a loop and lobster clip on the inside so I could attach my purse lanyard for security - plus it gave me an excuse for using some of this lovely ribbon I picked up in my local craft shop!
The handles were triple stitched for strength as I want my bag to last as long as possible. All that was needed then to finish it off was a button. I mentioned yesterday about the button... up to this point, all my decisions had been relatively easy so I never would have dreamed that choosing a button would be so hard! In the end there was me, my friend and the shop assistant involved in its selection and we must have looked at dozens upon dozens of buttons before a final choice was made.
I'm still not totally convinced, but I think thats probably only because I'd previously found the "perfect button" in my button tin - only it was the wrong size for the loop I'd made and I couldn't find anything else that resembled it, this button really does work very well with the blues in the beach hut fabric so I'm sure I'll grow to love it too in time.
Friday, 8 February 2013
Sewing Machine 101
I can't really remember a time when I didn't have access to a sewing machine, but after a disastrous house move back in 1992, my machine got damaged and despite numerous attempts at getting it working properly again, I finally admitted defeat last year and replaced my machine. The trouble is, its been so long since I was last able to successfully use my old machine, I've been putting off making use of my new one! Finally enough was enough and I booked a one-to-one session at Kathy's Patch for me and my sewing machine to get to know each other.
Well I made it to my sewing machine 101 this morning, even though I was feeling more like crawling back into bed after sleeping badly last night. A lovely lady called Jo, took me through maintenance, threading, bobbin filling, all the stitches my machine can do and she finished up by showing me free-hand machine embroidery - something I've always wanted to try. The nice squiggly bit at the top was Jo's (she made it look SO easy) I found it a little harder to control but as my first squiggles looked a bit like a B, I had a go at my name. Jo said it was very good for a first attempt... I think I'm going to need a LOT more practice! Marcus the bear came with me for some moral support as he enjoys trips out, meeting new people and having his photo taken. Once the session was over I'm afraid I succumbed to a little fabric temptation, so I now have some beautiful fabrics for a couple of projects I want to try soon. I also think it long be too long before I revisit this lovely shop!
Subscribe to:
Posts (Atom)